
Like most of my posts nothing I’m writing in this one is earth-shattering or new. Any reader familiar with individual lessons will recognize quickly what I’m talking about and why. Readers on the historical side, however, who often have little experience with this or who less often have a chance for individual lessons, may find this helpful. Regardless, discussing methods for increasing a student’s comfort and improving their ability to see actions and make decisions in real-time is valuable.
Generally, traditional individual lessons employ the same basic structure. A coach’s focus, personality, time-constraints, and student ages and experience weigh into this too, but normally it’s more a question of altering or augmenting the basic structure rather than adopting a completely different approach.
warm-up –> drill or new material –> cool down
Using sabre as an example, we usually start with a warm-up, such as a series of thrusts to the inside line from standing, then via the lunge; or a simple parry-riposte drill up and down the strip; or the “wood-chop” drill or similar. [1] This may be followed by drilling fundamentals—thrust and lunge, add disengage, or cuts to major targets, stop-cut drills, beats, feints—or by the introduction of a new technique or maneuver. To close there is usually a cool-down, often much like the warm-up (parry-riposte exercises, stop-cut drills, wood-chop drill, etc.).
In a sala where students are in class several days a week it’s possible to use the lesson to introduce new material and then have them drill with more advanced students. Assuming an appropriate degree of dedication this can be an effective strategy. If, however, one sees a student once a week, and especially if that student lacks others with whom to practice, it’s more difficult. Instructors are normally the first “foe” one faces, but improvement in fencing comes via meeting and overcoming new challenges, new challengers, not via habit and the familiar movements and tactics of one opponent.
Ideally, that lone student finds a way, either with you or another club, to find opponents and partners with whom to drill. This is always to be preferred, but until that happens what can one do to help them along, especially in terms of increasing their comfort with movement and the phrase? How can we speed them along, in a sense, when they have fewer opportunities to use what they’re learning? How can we get them to move beyond the one-two nature of so many drills?
Beyond the Play
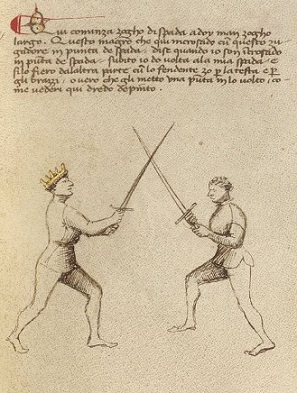
One of the challenges in historical fencing is deriving a useful curriculum from the sources. It’s especially difficult with older sources where more is assumed, the method of expression unusual, and where details we’d expect today are lacking. In Fiore’s corpus, for example, there are illustrations and descriptions, but a lot left unsaid too. Students working on the first master of the longsword wide plays, for example, have an illustration of the master and student crossed at punta spada (the top third of the sword or foible), another of the second option from this crossing, and an explanation:
Here begins the Gioco Largo (Wide Plays) of the sword in two hands. This Master who is crossed at the point of his sword with this player says: “When I am crossed at the points, I quickly switch my sword to the other side, and strike him from that side with a downward blow to his head or his arms. Alternatively, I can place a thrust into his face, as the next picture will show.”
Fiore dei Liberi, 1409
After the second image the Master continues:
“I have placed a thrust into his face, as the previous Master said. Also, I could have done what he told you, that is, when my sword was crossed on the right I could have quickly switched sides to the left, striking his head or arms with a downward blow.” [2]

There’s a lot here to work with, and the images help considerably, but it’s clear that Fiore assumes substantial knowledge on the part of the reader. Notice what is not there: there is no mention of how one gets to this crossing; we’re not told how the scholar might defend himself; while we know this is “wide play” there are no details about ideal distance or tempo; we’re not provided any indication as to which option to choose when, just that there are two. We have, thus, little context for this play, and not surprisingly when many of us learn it we do so as a set-drill. There are more and less effective ways to do this, but one hurtle many students must overcome is how to recognize that they’re in this situation within a bout, and, be prepared for what can happen after one of these options has been exercised. [3]
A similar conundrum faces students working on more recent material. One of my sabre students, for example, asked me how he might improve beyond the initial actions of a particular attack. In this case, he had no trouble making a feint-cut to right cheek, cavazione/disengage with a thrust from second, but if the attack was parried he found he tended to stop. He added that he often felt that way—there was the initial set-to, then he wasn’t sure what to do.
As we drill so we fight
In order to help him, we did the following:
Stage 1: from the engagement of second, cut right cheek (10x)
Stage 2: from the engagement of second, feint right cheek, cavazione/disengage and thrust to the chest (10X) [4]
Stage 3: from the engagement of second, feint right cheek, cavazione/disengage and thrust to the chest, BUT this time I parry the thrust and riposte
The first two stages are set-drills. Stage 1, which focuses on the attack the feint will simulate, is intended to prime the fencer to make as realistic a feint as possible. In Stage 2 they make the same action, this time as a feint, and finish the maneuver with a thrust. So far, the student is the “agent” as older English sources would term it, the instructor the “patient” or receiver. As is, these stages exercise the techniques which comprise this compound attack, but apart from working distance (potentially), they don’t situate the actions within the context of a bout. It’s a set-play focused on technique, distance, and tempo, but all on its own, isolated.
In Stage 3, we add just a little context. The instructor reacts rather than just receive the touch. When I employ this method I make sure that the first few parry/ripostes are consistent and the same, e.g. a half-step back, retake second, thrust, or I take fourth and riposte to the right cheek. After a few rounds of this, I then tell the student that I will vary the target on the riposte. This does a few important things. First, it alerts and prepares them to watch what I’m doing; they can’t just anticipate the same response. Second, it mimics what they’ll have to do in bouts when their opponent doesn’t call their shots. Lastly, they’re primed to continue fencing and not just stop after their attack, a common problem many fencers face starting out. Depending upon their skill level we may take it further with additional actions, especially if focusing on not stopping after the first three stages.
In the next exercise, we turn it around—I make the same attack (the one we’ve been drilling) and they practice the defense. Here too we start small and progressively add more actions. Depending on the student they can vary their defense too.
Approached well this takes a drill into what is, more or less, a bout in miniature. It situates a specific action or drill in context. It adds more movement. Because it’s a drill there is slightly less pressure for some students than a bout. Put another way, rather than face the giant question mark that is all the possibilities they might face in a bout, they face the smaller question mark of what to do following something they know, that they’ve been drilling the whole time. In the example just above, watching to see if I parry second and or fourth is much easier because it’s explicit, it’s limited to one of two responses, but it still trains the eye to watch the response and not anticipate or react blindly. This introduces a level of psychological comfort necessary for learning at the same time that it’s helping them grow accustomed to incorporating new actions into real time and honing observation skills.

There are other benefits to this approach. Placing the drill within a more combative context can serve as a pressure-cooker for testing more than how well they’re picking up a technique. If for example the student hesitates after the first few ripostes, encouraging them not to let up is important—if they have the advantage they should never stop before the halt. This said if they persist in the attack when it has failed, and up to that point neither person has been hit, encouraging them to take distance and reset is an acceptable goal. [5] Building confidence with a set of actions makes it that much easier for a student to incorporate them into their repertoire when they’re in the assault.
Progressive Drills in a Group Setting
Progressive drills can work in a group setting too. When I use this approach within a class setting I am careful to explain it at each stage, and check each pair of fencers frequently. This style of drill works best, however, with intermediate and advanced students. These students can help newer ones, but should have sufficient background to be able to notice basic trouble spots. Depending on the size of the class some amount of self-policing is necessary, another reason that it works better with more experienced fencers.
My more advanced students are quick to ask whenever they’re unsure about anything, and these discussions become opportunities to trouble-shoot, explain finer details, and explore variations on that particular drill. Time is often at a premium for many of us—we have barely two hours Sundays—but time taken to explain why we do something is important and isn’t wasted.
For beginners, I only use the progressive approach one on one, because the level of detail and attention required by both student and instructor is so much greater. One can make fewer assumptions, and sometimes we have to dial-back the complexity, something far easier to spot and correct one on one than in a group setting.
Progressive Drills & Curriculum Building
There is potential for this style of drill with our earlier works on the Art too. Returning to Fiore’s first master of the sword in two hands, wide play, the two options the master suggests could be Stage 1. Each partner would take turns attacking to work the two options. Stage 2 could introduce a defensive response—for the thrust, perhaps the defender counters with posta breve or frontale and cuts in turn or with the scambiar de punta (“The Exchange of the Thrust”). For the cut to the left side, one response might be posta fenestra followed by a thrust or a cut-around (or through) of the defender’s own. Stage 3, then, would allow the original attacker a chance to parry riposte, or, perhaps employ a move from the gioco stretto or close plays.
In the case of Fiore, whose exquisitely brutal system seems to have been intended to end a fight in two or three moves, there’s probably less need for long, extended plays (naturally proper safety gear is a must). This said there is value is situating his plays and exploring effective responses to them. Instructors in modern fencing will put students through drills with multiple actions within a lesson—something we rarely if ever need in an assault—because learning to work those multiple actions makes simple actions better.
For instructors struggling to get their students beyond drill and into effective use of what they’re learning, to move them beyond set plays, progressive drills offer one potentially rich source. For students working without an instructor, say in a study group, this can also be an effective method of practice. It might be especially helpful for those small historical fencing study groups looking for ways to expand their practice and build curriculum.
NOTES:
[1] Wood-chop or Around the Horn Drill: this drill primarily works target placement and the fingers. With a mask as target, either hanging up or on a partner, the fencer makes a cut to the right cheek with a double tap of the fingers, then to the top of the mask, then a single bandolier cut to the bib, and either repeats the sequence or goes through various parry/ripostes before continuing the sequence.
[2] Cf. http://www.nwarmizare.com/Pocket-Fiore/assets/www/getty_th_longsword2.html
This example is taken from the Getty, but a quick look at the three other known mss. adds little additional information. The Morgan is almost verbatim what the Getty offers and the Paris/Florius and Pisani-Dossi contain much less explanation.
[3] Drilling First Master: researchers approach it differently, but one of the most sound I’ve seen is that employed by Mike Cherba (Northwest Armizare, Sherwood, OR) and Alex Spreier (High Desert Armizare, Bend, OR), both of whom first studied with Maestro Sean Hayes (Northwest Fencing Academy, Eugene, OR). Mike, for example, will have students start at punta spada, or start of out measure and meet there; if there is pressure against the agent’s sword, they cut around; if there’s not, they thrust through. Though first master of gioco largo doesn’t necessarily require pressure to work, the advantage here is that it provides one possible framework for the play and trains the student’s sentiment du fer.
[4] A look at most 19th cen. and many early 20th cen. Italian works on sabre will demonstrate the importance of having the hand about chin high on the thrust. With the hand in second position (thumb to the left, knuckles up) or in first in second position a la Barbasetti, the top of the arm is covered by the guard, the hand high enough to prevent an unexpected shot to the face, and the arm is poised to make the parries of first, second, or fifth quickly.
[5] If defense is the goal, if the goal is not to be hit, it’s better to break off than risk a counter attack or attack into tempo. The longer a phrase continues the more likely one might be hit.
