As so often happens, a student observation yesterday during the first practice session initiated not only a valuable learning moment, but also provided a reminder to me as a coach about the place of detail in teaching technique. How much detail and just when we share it are often part of a balancing act between sufficient explanation to help the student and overwhelming them with too much information. Experience tends to be a good guide to this, but it varies by student, and there are times we misread and unwittingly confuse rather than clarify things.
In discussing a thrust with opposition, the student commented that until that moment he had equated “engagement” and “opposition,” and that this is one reason, so he discovered, that he has struggled to make a glide/glizade work. The two terms can correspond, but they’re different–an engagement merely means that the two weapons are in contact in a specific line; opposition refers to a way of parrying or thrusting that shuts out the opposing steel.
The student, so he shared, had been simply thrusting straight out from guard, say from third, along the blade, but importantly without opposition. In effect, he was only aiding his opponent–performed this way, he was placing the weak of his own weapon into the strong of his opponent’s, basically handing them a parry. It’s not that I haven’t covered how to perform a glide over and over again, because I have, but that the concept hadn’t really solidified for him yet. Both his version and the proper one slide along the other blade, but they do so very differently.
It was a key “a ha!” moment for him, and immediately it changed not only how he fenced yesterday, but how he will fence, how he will drill, from now on. A leftie, the chances of doubling with a glide are greater, because both weapons are in the same plane. Armed with new information, well, better understanding of old information, he was able to adjust his hand to the right height and create the proper parabola to target.
Later, in the hours before my next class, I thought about what had happened. Occasions like this are important and can help us improve our methods. First, I wanted to establish that I had not neglected anything previously. Second, I reviewed my notes for the ways in which I normally introduce this action. One of the things I noticed is that I list terms, but realized that in class I may not always define them or do so adequately. I do my best, but familiarity with the information can blind us to the fact that an “obvious” notion may not be so obvious to others. A similar phenomenon can happen in demonstrating an action–even should we execute it perfectly, students may not understand the finer points that create good execution.
So, for next time, my plan with the glide in a new class is to be sure to define the most important ideas. In this instance, that means making sure they see a distinction between an engagement/contact and the leverage that the glide requires. I will do a better job pointing out the height of my hand, its distance from the line, and how the glide follows a parabola to target. This will bring in other, critical concepts vital for success, from the proper measure to the tempo inherent in the action.

Generally, when we lunge with the glide, the point is lower than the fist, hand just outside our own bodies, angled slightly in, and upon termination of the lunge the hand is somewhere between the chin and nose. Some masters show it higher than that, but it need not be unless one is fighting someone uncommonly tall. It’s normally best to be as efficient as possible. Having engaged the opponent’s weak with our middle, the hand makes a slight arc as we reach for target–this ensures that we maintain leverage for as long as possible, this leverage being vital for opposition. Another way to refer to opposition is that one is “closing out” the opposing weapon, keeping it offline and maintaining that deviation so as not to double.
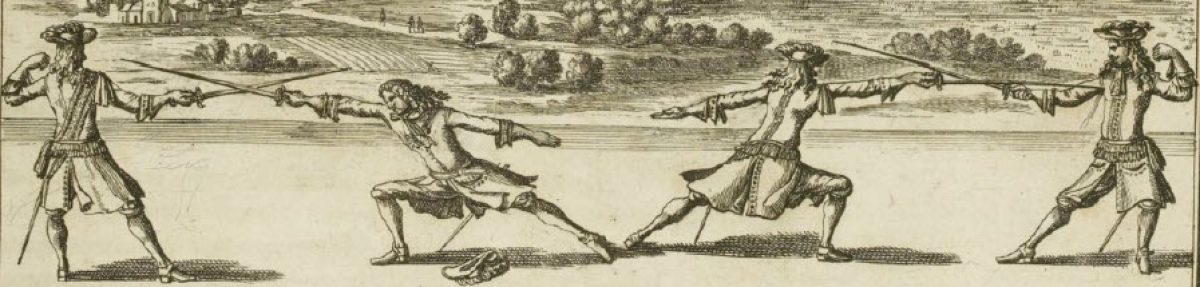
I’ve used this hastily drawn image before, but it serves well to illustrate the angle from above:

Though in this example the blades are not aligned ideally, one will notice that the fencer at the bottom has their point off-target. Assuming the top fencer shifts measure, either with feet or the arm, to command their weak, then they might perform a glide, and at this angle, the bottom fencer’s point will continue to go off to the left.
The “Point”
This short post is meant to highlight a few things. First, that we always be careful that we explain things well, demonstrate them well, and keep an eye out for problem areas.
Second, the ability to add or remove detail to assist a student is important, but takes time to develop. Start small, start simple. With a more advanced fencer, but new to smallsword or whatever you’re teaching, a lot of basic concepts will likely already be there–in this case it may be demonstrating how the action changes from foil.
Third, very few historical manuals go into great detail or as much as we often need to teach, so a major part of interpretation and implementation is filling in those missing details. This is arguably one of the most important, but dangerous things we do, because we leave the page and have to connect the dots as best we can. For smallsword, given the similarities between it and aspects of traditional foil and epee, this is a little easier to do. However, it remains tentative much of the time, especially for actions that became obsolete. It means constantly checking the details we provide against the text and/or texts which include the relevant action.
We will sometimes get it wrong, but this is part of the process, and if we’re conscientious, honest, and open to correction or new information, we are far less likely to go wrong.
