An old friend and fencing comrade, the excellent Jon Brammer, pointed out that I had mentioned but not followed up upon the master of arm’s examination I took in Prague. Apologies.
While happy to write about fencing, I find it difficult to write about myself, so I’ll be brief and say that I passed and share some photos.
In my sabre lesson this morning my student and I explored some options from the invitations in 3rd and in 4th. Like a feint, these actions (hopefully) encourage an opponent to attack where we want them to. Baseline, what we’re setting up is a parry-riposte. Against a newer, less experienced fencer, this might be enough, but a more advanced fencer will see the trap and have some idea where one might go with it. There are, happy to say, more options from this simple set-up than meet the eye.
Student’s Invitation in 4th
After the basic parry-riposte set up, a solid next step is an indirect riposte—this requires us to hold the parry before making the riposte. It is best used when our opponent is too quick to parry. For example, if we have made a few cuts to the head, even probing, or better yet from this same set up but slightly out of distance, an opponent might expect us to cut head and so they assume parry 5. If we see them do that once or twice, we can invite, parry, wait a sec, then as they preemptively parry head we strike in an open line. One of the safest strikes is to the lead arm, thrust or cut, as this keeps us back a bit and puts more steel between us and the opponent. One can, though, attack almost anywhere so long as one covers on recovering from the lunge.
Another option is a compound parry-riposte. This is closely related to the indirect riposte as it assumes similar conditions. Where the latter hesitates, the former feints. Following the example above, if one invites in 4th and parries 3rd as the opponent takes the bait, one then might feint head to cut arm, flank, or chest. The feint might be made to any line, but works best against a known proclivity. Here, again, some probing actions or false attacks can sometimes tell us which parries an opponent is quick to take.
These are all defensive responses set up via second intention. However, one question today was can one make a counter-attack from this set-up. Yes, and, no. At its root, invitations set up defensive responses, but this said there are ways to include a counter-offensive action given certain conditions. This part is critical. It is possible to make oppositions cuts into the attack from an invitation. These are similar to what we call “bearing” in Insular broadsword. Using the same example, from 4th, should your opponent attack a little out of distance or with a poorly extended arm—either one provides a bit more tempo to act—then from 4th one would but cut in such a way that one simultaneously closes the line as one lands. [1] From 3rd, one would cut across closing the inside line and landing at the same time (often this means striking the arm). It is not easy to set up as it requires the opponent to make specific mistakes, but if they do, this is a fun conclusion to the invitation.
Student Initiated Attack–Shutting Down the Trap
When we switched roles and I adopted the invitation, my student had a chance to explore ways to shut down the trap. Timing, speed, and choice of action all meet in a tight place when we succeed. Using the false-edge, for example, I did not expect, and it succeeded beautifully. Many fencers will be unprepared for that. It can made from farther away, again limiting the danger faced by the attacker.
The simplest option in springing the trap is to attack knowing they will parry-riposte, and then making one’s own counter parry-riposte. I didn’t want to complicate things, but in that counter parry-riposte one can do much the same as the person inviting: one can use an indirect riposte, compound parry-riposte, even an opposition parry and cut if conditions allow it. Naturally, one’s feet are critical in success. If, for example, my student lunged her attack, then I would take a step back to parry. If she recovered quickly, I would have to lunge to riposte; if not, I might do it from standing. Regardless, we need enough room–and thus time–to act.
Invitation in 3rd–Barbasetti (1899/1936)
We also discussed the difference between an obvious invitation, e.g. taking 4th, and an invitation disguised to look like either incompetence or inattention to the line. For the latter, one might invite in 4th barely exposing the outside line of the sword-arm. This can appear like a lazy or untutored guard. One can feign being tired and thus sell the lazy guard too. All about selling it, a major aspect of tradecraft. [2]
If we want to invite in similar fashion in 3rd, we might hold that guard a bit too far out exposing the inside of the wrist. Many of the same options we covered with an obvious invitation apply here too, but this style is more likely to work against a fencer farther along in their training.
When we switched roles, one effective and less risky attack she made was to thrust to the inside wrist when I adopted a lazy 3rd, allow me to parry, and then thrust with opposition (usually with an advance-lunge or redoublement). If I adopted a lazy 4th, she could feint to the outside, and when I parried in 3rd cut around and cut with opposition to the arm or chest, or, make a bandolier cut and step a little back and to the right. Getting good extension on the cut—which keeps one safer—means having enough distance to extend, thus moving more back and right versus in and right.
Tactical Application
This lesson was a mix of types–we covered technique, options, and tactics. Not every lesson need do this, and in fact many should not. Today I was working with an extremely gifted fencer, one with a deep foil background, and with whom I’ve been working sabre for several years. Even today, though, in the last drill she realized she was pulling her chest cut, so we stopped and spent the last ten minutes of our time just working on getting proper extension on her cuts.
The tactical considerations for using invitations should derive from whatever intel we’ve been able to gather about our opponent. Sometimes we have next to no time–we meet someone new in the ring or on the strip and have to triage our choices via testing, probing, and false attacks. Sometimes we have had a chance to watch them fence and see what they typically do, how they respond, and larger picture considerations–are they calm? Nervous? Excited? More defensive? Offensive?
Considerations of another fencer’s proclivities is vital, because no matter how sound or expertly an action might be, it might be the wrong one to use against that opponent or at that time. For example, if my favorite action were to invite in 4th, but my opponent is likewise a defensive fighter, then we’re as likely to run out the clock as anything else. Boring. If, however, I’ve made some assessments, have some idea of how they play, then I can pick actions which might work better. If they’re more defensive, then I’ll start with the more offensive options in the tool box.
This may seem obvious, and it is, but it’s easy to focus on something to our detriment. I know that more than once coming up I had learned a new, cool maneuver and couldn’t wait to try it out, but in my zeal tried it when there was next to no chance it would work. I have been extremely lucky to work with awesome coaches, and they would ask me, post bout, why I had tried it. They knew I was working on it, but had to remind me that not every action will work in every instance.
In terms of large, obvious invitations, they can work super well, but if they’re not–don’t use them against that opponent. Today, for example, my student is far faster than I am. Even playing the invitee role I struggled to parry some of her cuts; I know how to compensate for that, but even so had our lesson been a bout I would have realized quickly that obvious invitations were a super bad idea in fighting her.
Use the right tool for the job.
NOTES:
[1]Opposition Cuts: I do not spend a lot of time on them, but they do exist, even for systems that seemingly don’t include them. Where bearing doesn’t work well with a curved guard, it works super well with a basket-hilt’s flatter guard top.
Within a Radaellian context, opposition cuts normally mean making one’s molinelli in such a way that they simultaneously strike and close the line.
[2] Tradecraft: a universal of fighting, tradecraft refers to all the intelligence gathering and mind-games we play with an opponent. In addition, it is a game we play with officials too.
The excellent Sebastian Seager of Radaellianscholar blog and translator of Rossi’s 1885 treatise posted the following recently. It’s an excellent read:
from _Istruzioni per la sciabola di sciabola_ [_ (Instructions for Sabre Fencing_], by Arnoldo Ranzatto, first published in 1885, Venice; this is from the third edition, 1889.
Thanks to long-standing injuries and their maintenance I’ve not been teaching as much sabre than I have in the past, but I still have a few students grand-fathered in as well as one or two new people whom I’ve agreed to meet for Radaellian sabre. This summer I’ve had the pleasure to work with two adult fencers, both with experience, but new or newer to Radaelli’s method. As a firm believer that a teacher is (and should always remain) a student, I’ve found that no matter how many times I’ve taught the same, day-one material, that there’s always something new to learn, or, to appreciate in a way that I didn’t before. Students have a way of asking questions that help me refine answers, make them more succinct and intelligible, and that changes not only how I see the material, but also and importantly how I teach it.
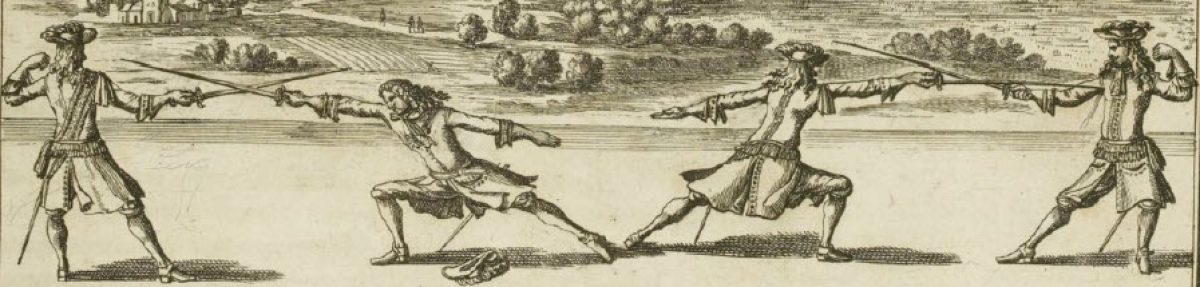
The Scarto
In this post I’d like to focus on the scarto, a “shying away,” which was a key feature of Radaellian sabre, and, what sometimes proves a missing piece in modern reconstructions. In March of 2021 I added a post here entitled “Italian Sabre & ‘HEMA'” where I explored some of the reasons for the lack of popularity for this system. [1] One of the major criticisms leveled at the Radaellian method is the size of the cuts and the relative time it takes to make them. I’ve hear this from people in the community as well as from new students with some experience. It’s an important observation, and reveals to me that those of us teaching Radaellian sabre likely need to make the purpose of the scarto far more clear in our lessons.
What’s Up with this Leaning Stuff?
A natural question comes up in viewing the scarto–why should one do it? Everything we teach should have a solid reason for inclusion; it’s never satisfactory to say “because it’s in the treatises.” The why is critical. In origin, this shift of the trunk likely derives from fencing in the saddle. Giuseppe Radaelli, after all, was a cavalryman and his system was designed to revamp then current practice. Before Radaelli, the wrist was used as the axis of rotation for cuts, but in actual use some troopers found it ineffective in battle and thus Radaelli’s innovation, the elbow-driven cut. [2]
Christopher A. Holzman, who more than anyone else has opened up the Radaellian corpus to the English reading world, discusses briefly the connection between the scarto and mounted combat. His take on the scarto in The Art of the Dueling Sabre, which provides a translation of the 1876 edition of Del Frate’s manual–the first to codify Radaelli’s method–is corroborated by the evidence contained in Ferdinando Masiello’s 1891 Sabre Fencing on Horseback[3]. In short, from the saddle, both cuts and thrusts include a slight lean towards the target; in part this is explained by the height of one in the saddle, but it also helps ensure, for cuts, that enough of the weapon meets target to be effective.
Remember that when mounted one’s feet are in stirrups, one’s thighs grip the flanks of the horse, and one’s left-hand grips the reins (all troopers regardless of handedness were trained as right-handers)–all of these contact points affect movement of the upper body. Reach and angle are both affected–even in late cavalry practice we see troopers leaning forward if not to the side in stills from drill and maneuvers.
French Dragoons illustrating the lean in the saddle
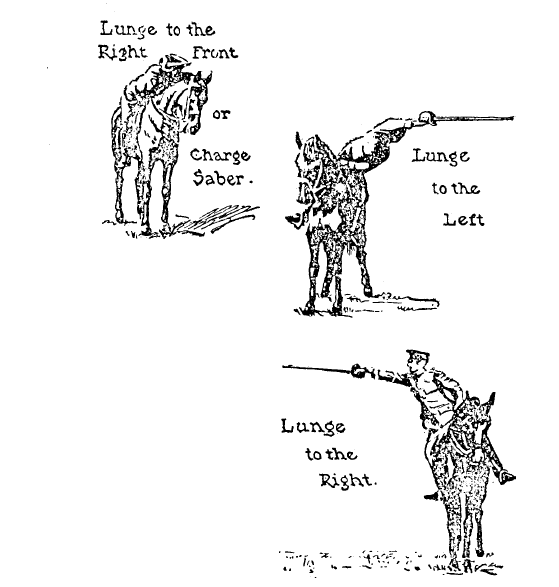
Though I’m not a great fan of Patton’s sabre, his Sabre Exercise from 1914 is another excellent point of reference for the place of the lean or scarto:
Patton, Sabre Exercise, 1914
Moreover, and without meaning to upset animal-right’s activists, the lean we often see in period photographs and illustrations owes something to the fact that the horse’s head and breast offered some cover as one faced the enemy. Though most late period cavalry engagements did not assume one-on-one melees between troopers, the lean toward the enemy may have helped one void the enemy’s weapon as well as assist reach to target. In reverse, leaning back to parry introduced that much more distance to attempt to defend.
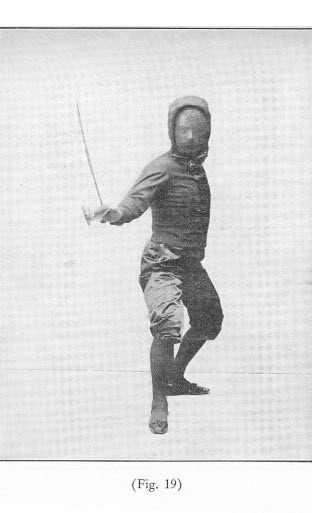
Unmounted cavalry sabre exercise in Italy, as in other places, included the use of the lean. [4] Even for exercise on foot, which is to say not standing as if mounted, we see this lean:
Compare the angle of the trunk here, in line with the rear leg, to that in Del Frate:
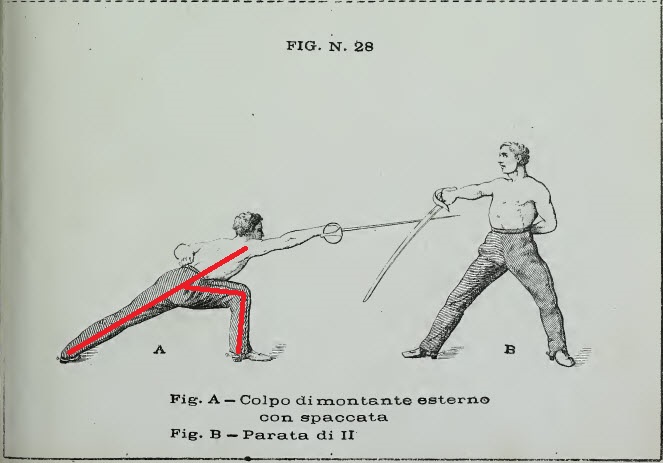
Del Frate, 1868: while rendered rather extended, as the red lines I’ve drawn indicate the trunk should be no farther than the angle of the rear leg.
What the Scarto Achieves
The historical precedent for the scarto is important to know, but for the vast majority of us fencing only on the ground vs. in the saddle, what good does it do us? Everything. The scarto, combined with proper management of measure, tempo, and judgment is what makes the system work against those traditions which rely more on quickly made direct cuts.
It’s the scarto which provides that additional bit of insurance when we attack or defend, and which when used properly discourages counter-attacks to the forward target. It should anyway. If you’re a Radaellian fencer and you’re experiencing stop-cuts or an arrest when you make your cuts, then add the scarto.
There is one caveat and a vital one for anyone mixing with non-Radaellians in “HEMA:” many if not most opponents will try to hit you anyway.
I forget which number of dead horse this is that I regularly beat, but many opponents will ignore the giant cut speeding toward them and select the ify counter-attack. They will argue that they hit you, and sure, they did, but they should not have: they should have opted to defend themselves first. Here as in most things we must artificially remove the mask and safety gear and imagine the weapons in our hands are sharp. NOTHING we do in historical fencing makes sense if we neglect this.
For example, imagine an opponent makes a cut to your head. You parry in 5th, then start the molinello from 5th to the inside cheek (assuming two right-handers). Made with the torso upright you might get the cut out without being hit with an incidental slice, but with the opposing steel there, and the tempo the elbow-generated cut takes, it’s possible for the opponent to draw the sabre back to guard and rake the arm as they do.
Now, add the scarto. When you take 5th, you add a little more distance with the slight lean back; this not only charges the blow a bit more, but importantly means that you start the cut from slightly farther away. The weapon always leads the way–it’s a universal–so… with the cut starting sooner, from juuuust out of distance, they have a choice: stop the giant cut or go for the counter.[5] One of these is sensible, one stupid. For it to work, however–and this is the important part–the opponent has to recognize the difference. Thanks to the fact that too many in HEMA are thinking more in terms of points than imagining sharps, one is likely to be hit a lot trying this out.
Do it anyway. We shouldn’t limit ourselves because our opponents are poorly-trained and approaching bouts as if slapping bells, however “martially,” with their cousins, Olympic sabreurs.
Incorporating the scarto will take some practice if you’re not already doing it, but it’s worth the effort. Start by employing the scarto in solo drills. [6] Next, use them in pair drills–a simple parry/riposte exercise is perfect for this. Once you’re comfortable, add it into all drills and into any bouting. With your fellow Radaellians, this will improve your appreciation for the system. Used against skilled opponents, the addition of the scarto will demonstrate why it is Radaelli who has been called the “father of modern sabre” and not someone else. [7] Lastly, remember against the average “HEMA” sabreur you cannot expect them to understand why despite their sense of victory they’re actually getting spanked, but you can take some comfort in knowing that you’re doing right by the system we study and more closely approaching what historcal fencing should be.
[2] For the impact of Radaelli’s innovation, see William M. Gaugler, The History of Fencing: Foundations of Modern European Swordplay. Bangor, ME: Laureate Press, 1998, 166-167; see especially 194-205.
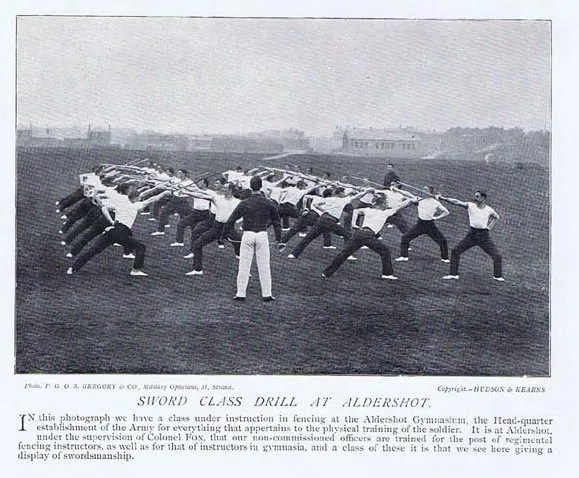
[4] We see use of the lean in other systems–this image from Aldershot, for example, would suggest the influence of Masiello on the 1895 English Infantry Sabre Exercise. NB: Radaellian sabre was split into three expressions–mounted practice, drill as if mounted but on the ground, and, on foot, the latter intended for combat as well as the growing agonistic sphere. What does “unmounted cavalry drill look like?” Like this:
English cavalry recruits, unmounted drill, 1914
[5] Counterattacks are a risk against a certainty. In the sport, so long as one makes the touch before the light (i.e. as if “in tempo”), fine, but it doesn’t work that way when they’re sharp. Put another way, if something sharp and pointy is about to hit one the smartest thing to do is go on defense, to parry, not to think “oh yeah, I’m just gonna go for it and hit them first; should work fine, no problem.” No, it might not work out if one’s goal is not to be hit too. In teaching counterattacks, regardless of weapon, I generally advise students to counterattack only if they’re at least one tempo ahead of the opponent’s attack; it follows, then, that in most cases the opponent has made a tactical error. They might have started the attack from out of distance; they might have started the attack with a bent arm or foot/body before weapon; or maybe they’ve just failed to cover their arm on the way in; in these cases one should, distance, timing, and judgment allowing, have a chance to attempt the counterattack and cover with a parry/riposte should it land or fail. If it looks like one might not have time to cover, don’t try it. Just parry and riposte.
[21-23 April, 2023] Next week the excellent Russ Mitchell and crew at Winged Sabre Historical Fencing, Atlanta, Texas, are hosting the St. George’s Day Exhibition of Arms (see link below). I have the honor to teach at this event and will cover two, related topics in Radaellian sabre.
The first is all things molinelli, that is, an exploration of the powerful, elbow-as-axis cuts fundamental to Radaelli’s approach. They were used not only for exercise and to build the muscles required for these cuts, but had offensive as well as defensive uses too.
The second class covers Masiello’s unmounted cavalry drill and exercises. Since the Radaellian method was primarily developed for cavalry it makes sense to acquaint oneself with this aspect of the tradition. Cavalry troopers not only practiced their style of combat in the saddle, but on foot as if in the saddle, what Masiello called come a cavallo, “as if on horseback.”
This video is so good. SO. GOOD. Chris is a friend and a mentor, so I know I am partisan and possess some bias, but for those who listen and find themselves uncomfortable, I challenge you to listen to what he says. Some of it will be hard, but it’s important. Few people like being called out for the inconsistencies and nonsensical things we do, but wee bruised egos aside it’s healthy for us to do so.
This is also a wonderful introduction to Radaellian sabre, a thorough examination of how this system influenced so many others, of the development of the sport, and a personal bugbear, another nail in the coffin in the silly dichotomy people insist exists between so-called “military” sabre and “dueling” or “sport” sabre.
One of the aspects of working with new people I most value is their fresh perspective—it’s all new to them, so they ask the questions we should all keep in mind but tend to forget. Fencers take a lot for granted. It’s one reason that even the most expert fencers should continue to drill basic, fundamental actions and study. While most everything is challenging at first, among one of the more difficult conceptual hurdles for many fencers—new and old—is how to keep oneself covered, not only in defense but also and more critically in offense. The artificial nature of what we do combined with cultural influences tend to cloud our reasoning about this. There have been a number of attempts to manage this problem, most famously perhaps the idea of “right of way” (ROW) in Olympic fencing, but no rule-set or explanation will do the job on its own. We need to cultivate an acutely conscious if artificial sense that the blunted weapons we use are sharp. If we do not, then we run the risk of failing to teach our students how not to be hit.
What follows is a quick break-down of how I’m tackling this. Cultivating a sense of realism in practice is a topic I mention often, I know, but it’s because it’s something I struggle with like many instructors and it’s a problem I see at play in most clubs. I don’t have all the answers, but can share what I’ve found to work, and especially, the holistic approach I’m trying to implement.
Start with the Weapon
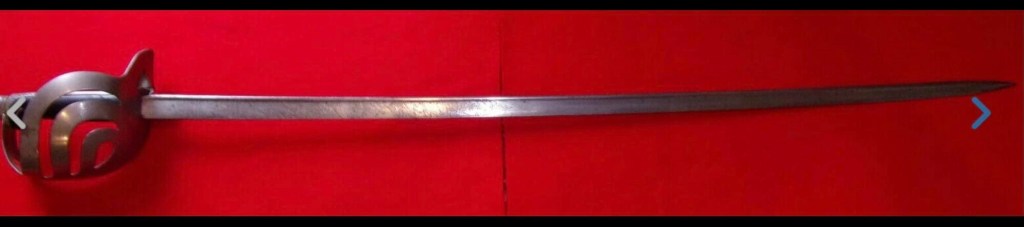
1873 Cavalry Sabre, Italy
From the outset I try to instill a sense of weapon-as-live in class. Normally, especially with kids, I have a period piece (unsharpened) on the first day to compare it to the modern versions. For sabre or foil, for example, seeing the blade profile of a period sabre, smallsword, or epee d’combat, and feeling the weight of each can do a lot to increase their appreciation of the difference in the tools we use versus what people used in the day. With adults or older children using historically inspired trainers this is easier because they are using weapons that better approximate those early tools. In both cases, however, I explain the parts of the blade that are sharp. For those that have held heavy blades, say the cheap overly ponderous facsimiles out of India or the HEMA-Bruh weight of a trooper sabre, the easy heft of a 650-800g sabre can seem unimpressive. Depending on audience I relate either contemporary, analogous examples or cite one of the recorded battles in which one of these “light” weapons proved just as nasty as anything twice its weight.
The kitchen or hobby knife mishap is a suitable modern analogy for children. IF they ask about how dangerous this sabre or smallsword/foil was, I ask them if they’ve ever had a bad cut from some accident in the kitchen or in making crafts. Most have had some manner of accident or witnessed one. This makes the danger a little more immediate. For that one kid in Toughskins who plays it off as no big deal, I remind them that the slice we give ourselves in the kitchen or the toothpick that pokes into our hand as we make some craft, are accidents—with swords, the person threatening another with it intended to hurt that person. It makes a difference. I add that we of course do not want to hurt anyone, but that we need to remember that this is what swords were for, because if we forget then we take chances we shouldn’t.
Reenforcing the Idea of Defense First
Del Frate, 1868
Teaching affords us many opportunities to remind students about the nature of the weapon they are studying. Repetition of an idea as they repeat actions helps cement both thought and action in their minds. For example, when I teach them the guard position in sabre I have them in 2nd. This was typical of the Radaellian approach, but I also explain why it was the preferred guard. It directs the sharp point at target, and since the arm is somewhat extended this puts us a little farther behind the guard— as a compromise between presenting a threat and staying away from one ourselves it’s thus an ideal place from which to start. [1] When they make a direct thrust from 2nd, I explain that the dangerous bits, the point and edge, must move first and for the same reasons: it ensures that we are threatening the opponent and staying as far away as possible at the same time. If we fail to threaten them, they may counter attack.
One of the places this is most difficult for students is in learning to parry and riposte. For example, in the last two classes I took them through this simple phrase:
1. Fencer A: from 2nd, thrusts to inside line
2. Fencer B: parries in first, then ripostes via molinello to the head
3. Fencer A: parries 5th, makes molinello to left cheek
4. Fencer B: parries in 6th, makes a molinello to the right cheek
[*assuming two right-handers]
This is a progressive drill, one we work up to over the course of the class, and instructive on several levels [2]. That third step, however, tends to go awry, because Fencer B in step 3 or 4 will sometimes remise rather than parry. [3]
Parry of 5th against a cut to the head, Pecoraro & Pessina, 1912
I stop them at this point and ask them to explain the action. When they get to step four, I ask who got hit and who got the touch. They should see that they were both hit… It can be a subtle point, because if A holds that parry too long or takes too long to riposte there is sometimes a tempo in which B might remise. However, once an attack has been parried the very first thought we should have is “my attack failed and my opponent is likely to riposte, so, I need to think defense first.”
It’s not an accident that traditionally we don’t teach the remise week one. It’s a maneuver that requires the fencer to have sufficient understanding and an adequate sense of timing and measure to pull it off successfully. New students struggle to see where the blade is going in a direct thrust or cut, so it’s best to hold off teaching them attacks into tempo until they have a decent command of elementary attacks. Even explaining what went wrong in step 3/4, many students will scratch their heads and doubt.
Two Dead Samurai
What tends to hang students up in step 3-4 is that they know they “hit.” B, for example, will often counter “but I hit them.” This is another instance in which I remind them that if the blades were sharp then they would be both be hit, and that since the goal is not to be hit, that the better decision is to parry and riposte. In class with the kiddos I usually refer to this as “two dead samurai”—mixing metaphors here but the words of Anthony Hopkins as Don Diego de la Vega in “Mark of Zorro” (1998) spring to mind, “Oh, yes, my friend, you would have fought very bravely, and died very quickly.” Because they’re masked, wearing jackets, and using blunt swords they feel safe; because the class they’re taking is voluntary and for fun they are excited instead of afraid; and, movies, books, and tv have cemented an impression of sword-fights that are great for stage but not necessarily accurate. Thus, it’s sometimes an uphill battle to keep the past-reality around the current one. If our goal is to mimic as best we can swordplay as it was/would be, then we must keep that earlier reality in mind.
The entire question of who got the real hit explains why ROW, HEMA’s fetish for the after-blow, and other peculiarities within rule-sets have developed. We’re always trying to find a way to highlight, as accurately as we can, just who won an exchange. ROW emphasizes the priority of the attack where HEMA’s after-blow rules are meant to encourage one to cover. Both punish obvious mistakes; they just focus on different problems [4]. Neither, however, is perfect and interpretation not only over what the judges see, but also what a rule actually means are issues which can further complicate officiating. The inclusion of “off-target” in Olympic scoring and the lack of concern over who starts an attack in HEMA (it does matter) are good examples of where our various rule-sets fail us.
The Logic of Sharp Things
In simplest terms, and the way I explain this to younger fencers, is that we want to stay away from an opponent’s sharp point while at the same time threatening them with ours. If both opponents do this, then at least they start at a stand-off, each relatively safe, each facing the question of how to get to target without being hit themselves. We are safest behind the point, steel in front of us, and the moment we change that, even to attack, we increase the risk of being hit.
Imagining the danger can be difficult, so depending on the age I change the threat. For example, with the current crop of intro students, all of whom are 11 or younger, I tell them that the point of the foil and the point/cutting edge of the sabre contain “Great Stink” and if they’re hit then they’re “skunked.” They laugh, but for this age group especially the threat of smelling bad is more approachable. It can also add to the fun.
The goal with this is to help students learn to react and plan appropriately. With younger students, so many of whom are ready to wield a foil in two hands like a lightsaber, jumping into a fencing class is play, a chance to pretend, and even when we structure classes well and keep them busy with games and drills, they will still find ways to act out the famous battles they know from movies. As one example, in my last p&r class I had them repeat the same drill above, and when it opened up after those three initial actions one pair set-to blade banging against blade with no thought to making the touch. It’s an age group that requires constant corralling, and each time is an opportunity to ask them “would you do this if the other blade could hurt/skunk you? How open are you using that foil in two hands? You’re gunsta stink Hoss…”
Why this Matters
I’m all for fun and do my best to make classes enjoyable for the younger set, but at the same time I want them to learn to fence properly. All this early focus on the reality of the sharp point is critical—without this all we’re doing is playing tag. Ensuring that students learn this helps them understand why we do what we do, why technique developed as it did, and if we’re lucky serves as another connection point in retention of new information. At the same time, the sooner we set them on this path the less likely we may need to correct some of the common faults we see as they progress.
Much of what and how we teach comes down to goals. It’s not my intention to disparage any one rule-set or fencing culture; people pursue what appeals to them and that’s fine. If tag is your thing, go for it. What I will say, however, is that for those of us ostensibly teaching historical fencing, a major goal is approaching everything as best we can as if the weapons were sharp, so we must pay some attention to inculcating an awareness of danger however artificial. It’s sort of, well, the point (pardon the pun) of what we’re doing. [5]
NOTES:
[1] The modern preference, and indeed historical preference in some sabre systems, is for what the Italians refer to as terza bassa, but which most people think of as third in Olympic. This version of third (outside guard for fans of English broadsword) derives from Hungarian practice. Both work, but they set up different expectations. A guard in second is at once defensive and offensive; Hungarian third is defensive: the guard and blade are held closer to the body, so parries are made closer to the body and set up speedy direct cuts well. Second, on the other hand, presents a sharp point from the outset to discourage someone from rushing in; parries are taken a little farther out and the hand moves less far in transitioning between second, first, and fifth, the first triangle of parries.
[2] There are many types of drills and ways to structure them. Progressive builds like this one take an action and build upon it. For beginners I lay out each step—this makes it easier as they don’t have to read and decide what to do the same way as when unscripted, and yet still gives them good practice in watching and reacting with one set of appropriate responses. They develop confidence and feel like they are fencing, which given how complex coordinating all these movements is helps them continue working. Adding additional movements within the phrase, changing the actions, adding different footwork, and either limiting responses or adding unscripted portions are all ways to add complexity. With this particular drill, we’ve not moved beyond being in guard and lunging back and forth. Next, they will do this with movement back and forth, advancing and retreating; then I have them start from farther out, out of measure, and work the distance to complete the drill.
[3] The remise is the renewal of an action/attack after it has been parried or while the defender is preparing to riposte. Some refer to this as a reprise, but this normally includes a return to guard (forward or backward) before repeating the action/attack.
[4] Doubling, or the incontro, is one of the most common faults we make, and often it’s because we have a plan and follow it through without considering how facts change in the moment. Rule-sets can support this. Outside of epee, where a double penalizes both fencers, one need only make sure they land with priority, with ROW, to score—if they’re hit, it doesn’t matter, because they had right of way. In HEMA, which generally doesn’t consider who started an attack only who was hit, doubles are particularly thorny. Was it a double or an after-blow? This is cart before the horse. The first consideration should be who presented a credible threat first and how did the other fighter respond? If the defender chose to double or just reacted, they goofed up. Sure, the attacker should do all they can to cover, but that second fencer didn’t observe the don’t-get-hit rule, the primary rule, and shouldn’t be rewarded for it.
[5] In HEMA competitions, for example, a lot of exchanges are deemed doubles that highlight this problem. In fairness to the fencers, the director has significant responsibility for seeing and interpreting what they’re doing, and the quality of directing varies considerably. To illustrate these reasons, we can examine—for the first—something as simple as how we extend the blade, and for the second the gulf we sometimes see between what we think we are doing in a bout and what we have actually done. In terms of technique, we see the reality of the sharp point in how we make a direct thrust: from 2nd in sabre or from tierce in smallsword, the hand is shoulder high and slightly outside the shoulder, because this helps close the line. Held directly in front, stiff-armed—which many students adopt at first—the arm is likely vulnerable. When I correct this, I remind them why we hold the hand the way we do, where we do. Regarding the second idea, that plan/execution don’t always match up, many fencers in bouts, be they practice or in competition, assume they’ve made the touch when in fact they haven’t or have doubled. It can be hard to see this—after all, they had a plan, they executed the plan, and thus are confident that they did what they were supposed to do. However, for anyone who has felt this way and then seen video footage of themselves… well, it becomes easier to see how intent and execution don’t always align perfectly or do but at the wrong time.
It’s easy to point out examples where we go wrong in using historical fencing sources. It’s also important if we care about producing the best interpretations we can, but on it’s own pointing out a problem isn’t the same as providing possible solutions. From time to time I like to take a passage from a source I use and share my approach. The one caveat is this: I don’t have all the answers. I’ll be the first to admit that. What I do have, however, is extensive training in language, source analysis, and fencing theory, not only theory as it is taught now, but theory as it developed over the past 500 years. Taken together these can be valuable tools for making sense of sources.
Start with the Source
For historical fencers our primary authority is the page. This can be tricky. We are removed in time and culture, explanations vary in depth, and we often face an incomplete record. Each of these factors alone or together affect how much of that authority we can access, and thus, how much we can interpret with any surety. The more information we have for a system, the better, but this depends too on the nature of that information. We have, for example, far more detailed description for rapier across languages and time, but have far less for medieval sword and buckler.
Most people, in my experience, look to an instructor for help; the burden for doing this work is then more or less shifted to that club and its instructor. Assuming one’s instructor is doing an effective job at interpretation, then there’s arguably less to worry about. However, a good instructor will be able to explain their work, methodology, and approach. In ideal cases they share that information day one. This is one opportunity where we can assess an instructor’s ability.
If you don’t have access to an instructor, if you like to read on your own, or if your instructor is giving you homework, then it helps to have some help. Let’s say you are one of my students and I’ve given you this passage from a key Radaellian sabre manual, Settimo Del Frate’s Instructions for Fencing with the Sabe and Sword:
56. Molinelli Alternating with Parries
When the student has learned the execution of the various molinelli and parries, he must become competent in their execution by repeating the same molinillo many more times, alternating between the various molinelli, and alternating and mixing them with various parries. He will also do this exercise while moving. This practice must be performed with proper progression to be worthwhile, giving the student nimbleness and ease in the handling of the sabre, which he can easily put into use. He will also learn the advantages of moving and rotating the sabre in the hand with the movement of the forearm. The exercise is also valuable to clear in his mind the advantages of the reasoned progression of instruction.
This lesson of molinelli alternated and mixed with parries teaches only one new thing, which is the way and time to turn the edge in proper amount. When the various molinelli are executed at the same time, the commands are given for the execution of the molinelli and parries, only having to modify the preparatory command to the exercises that the students are to execute.
For example:
Two molinelli to the head, the first from the left and the second from the right, and then a parry of 5th and a molinillo to the face from the right, or—
Two molinelli to the face from the right, a parry of 6th, and a rising molinillo to the flank, or—
A molinillo to the face from the right, a parry of 1st, and a molinillo to the head from the left, cavazione (or coupé) and on guard in 3rd, etc.
The exercise is easily varied, and it will be necessary for you to adhere to a reasoned and complete progression, in order to obtain from this important practice the greatest possible benefit.
[Christopher A. Holzman, The Art of the Dueling Sabre: A Translation and Explanation of Ca. Settimo Del Frate’s Award-winning Textbook on Giuseppe Radaelli’s Sabre Method for the Fencing Masters School of Milano, Staten Island, NY: SKA Swordplay Books, 2011, 39-40]
56. MOLINELLI ALTERNATI CON PARATE
L’allievo che ha appreso l’esecuzione dei diversi mo linelli e parate, è esercitato nella loro esecuzione, sia ripetendo più volte lo stesso molinello, sia alternando i diversi molinelli tra loro, sia alternandoli frapponendovi le diverse parate ed anche le diverse marcie. Quest’esercitazione fatta a dovere e con giusta pro gressione varrà a dare all’allievo quella scioltezza e faci lità nel maneggio della sciabola per cui potrà mettere in pratica più facilmente e sentire i vantaggi di muovere e ruotare la sciabola ferma ed equilibrata nel pugno per movimento d’avambraccio, e varrà inoltre a chiarire nella sua mente la ragionata progressione dell’insegna mento ed i suoi vantaggi. Per questa lezione di molinelli alternati e misti con parate, si avrà solo da insegnare, come cosa nuova, il modo ed il tempo di girare il filo con giusta gradazione, quando si devono eseguire più molinelli dalla stessa parte; per il rimanente valgono le norme date per l’ese cuzione dei molinelli e parate, fatti separatamente, avendo solo l’avvertenza di modificare il comando ana logamente agli esercizi che si fanno eseguire.
Per esempio:
Due molinelli di testa, il primo da sinistra il secondo da destra –parata di 5a e molinelto di figura da destra – oppure:
Due molinelli di figura da destra –parata di 6a, e molinello di montante da sinistra – oppure:
Un molinello di figura da sinistra –parata di 1a, mo linello di testa da sinistra — cavazione (o coupé) e guardia di terza, ecc., ecc.
Gli esercizi come si vede facilmente, ponno essere mol tissimi e svariati, e sarà necessario l’attenersi ad una progressione ragionata e completa, onde ottenere da questa importante esercitazione il maggior frutto possibile.
[S. Del Frate, Istruzione per la Scherma di Sciabola e di Spada, Milano: Litografia Gaetano Baroffio, 1876, 49-50.]
If you have some Italian and a copy of the original work, then it’s a good idea to place it side by side your translation. In this case, Chris Holzman is one of the best translators working on the Italian corpus: he has a number of native speakers—who are also experienced fencers or maestri—read over his work. This is a vital process in any translator’s work. It’s due diligence. Even with an excellent translation it is helpful to look at the original provided you possess some ability with the language. Reading them side by side will reveal a translator’s choices, but it will also reveal nuances that translation sometimes has trouble capturing.
Now, what do you do with this passage? First, read it more than once, and as you do so isolate key ideas. Right away one knows from the subheading that the number “56” suggests that this is deep within the text. The author, Del Frate, was adamant about the logical progression of lessons, so if anything here is unfamiliar then rereading earlier sections will help. If for example you don’t remember the difference between a molinillo to the head from the left and one to the face, go back and read that first. Or maybe you don’t recall exactly which parries are which. Go back and review. Once you feel more certain with these, then reread the passage again. Then read again and take it line by line.
The first line informs us that this exercise builds on previous lessons, so review can be useful. It also tells us that what this section provides is a way of mixing the molinelli with parries. In review you recall that Del Frate introduces the concept of the molinelli first (§8, 10 Holzman; §8, 16-17 Del Frate), then covers each molinelli in turn through Chapters VIII -X (§42-55, 339, Holzman; 39-49 Del Frate), and finally he offers a few different exercises with the molinelli, such as the one covered here, as well as with a lunge (§57, 41, Holzman; 50-51 Del Frate) and against attempts at engagement (§58, 41-42; 51 Del Frate). If the idea of mixing molinelli and parries is odd at first, then be sure to read each of these sections in succession first.
Del Frate’s method, Radaelli’s, is progressive. We first learn the molinelli as an exercise and way to foster strength, flexibility, and edge alignment. As we improve, we see that each of the molinelli not only cover the major lines of attack, but travel through each of the parries as well. From standing we add movement, first with a bit of lean, then with the feet, the lunge, and then all of it together. So, since this mix of parries and molinelli is near the close of the section for sabre and just before the synoptic tables, it figures that the author assumed some facility first. In the cavalry this was, of course, a lot easier to establish as the troopers had regular drill under military sword masters.
The next few sentences establish additional reasons for the drill:
it will impart “nimbleness and ease in the handling of the sabre”
the student will “learn the advantages of moving and rotating the sabre in the hand with the movement of the forearm” [1]
and “the exercise is also valuable to clear in his mind the advantages of the reasoned progression of instruction”
These are handy to keep in mind as you work through the drill—they’re the reasons we bother doing it. We also learn that this exercise teaches us one new thing:
This lesson of molinelli alternated and mixed with parries teaches only one new thing, which is the way and time to turn the edge in proper amount.
Now, assuming you’ve had experience with molinelli and can perform them pretty well, how do you incorporate this section of the text?
Important to note, Del Frate is addressing an instructor here, thus the reminder that in giving commands the only change is what commands the instructor gives. To explain this Del Frate provides three examples. These are a fantastic place to start.
Two molinelli to the head, the first from the left and the second from the right, and then a parry of 5th and a molinillo to the face from the right, or—
Two molinelli to the face from the right, a parry of 6th, and a rising molinillo to the flank, or—
A molinillo to the face from the right, a parry of 1st, and a molinillo to the head from the left, cavazione (or coupé) and on guard in 3rd, etc.
Each of these can be performed solo or with a partner. If you’re mining this section for pell-work, then start with these three and when you’re comfortable mix and match with other parries and molinelli. If you have a partner, it will help to write out just how this will work, and then when you meet go through it a few times slowly, e.g.
Del Frate, “Mixing Parries and Molinelli” [cf. Holzman, 39-40; DF 49-50]
1. Two molinelli to the head, the first from the left and the second from the right, and then a parry of 5th and a molinillo to the face from the right, or—
Drill as Is:
Fencer A in 2nd; Fencer B in 2nd
Fencer A makes a molinillo from the left to the right; B receives touch
Fencer A makes molinillo to the right to left; B receives touch
Fencer A parries 5th, and makes a molinillo to the left cheek
Drill as Partner Drill*
Fencer A in 2nd; Fencer B in 3rd
Fencer A makes a molinillo from the left; B parries 5th, cuts head
Fencer A parries 5th, makes molinillo to the right; B parries prima, ripostes to head
Fencer A parries 5th, and makes a molinillo to the left cheek
*This adds an additional parry for A, and more realistic responses from B. Everything we do should have real application, especially in partner drills. An instructor can take the part of B in the first instance, because part of an instructor’s job is to provide a target. We can assess what a student is doing well in this way and make corrections. As we add complexity, the instructor’s role takes on more realistic behavior.
Starting with a drill as written is best. This can be surprisingly difficult at times. In Luigi Barbasetti’s The Art of the Sabre and Epee, for example, his description of the rising cut from the right is dense.[2] It’s not impossible to figure out, but it’s not the clearest description either. So, take your time, and if needed take one portion, one move of a drill at a time.
As an instructor I use this differently than I do as one of a pair of fencers just working out. If neither you or your partner is the instructor, then the second option above is going to do more for you, because it more closely mimics what we actually do in a bout. While we might make two cuts in succession, more often than not our opponent will react to the first one, so mixing in more for Fencer B makes sense. It’s still important to go slow before going fast, and to keep it simple at first. Even if that is just for warm-up, it will help. It’s practice seeing the lines, gauging the time to respond, all of that. Doing the drill as-is is fine too.
For the instructor sharing a drill like Del Frate’s molinelli with parries, focus on proper technique, placement, and flow with newer students. It’s a good place to start with multiple action drills. It will take time to perfect, but early encouragement and praise of what they are doing well is vital. As they become more familiar with the drill the instructor can shape the clay as it were more directly; students tend to be more accepting of criticism when they have a better grasp of the task and when they don’t hear a litany of complaints the entire lesson. This stuff is difficult, it’s easy to feel overwhelmed—an instructor should never forget that.
If an instructor is working with more advanced students not only can one mix and match molinelli and parries, but also the tempo. The second drill, for example, where there are two cuts made to the face from the right, then a parry of 6th, and a molinillo from that parry to the flank, one can have the student start out making each portion in regular succession, then change it up so that say the second cut arrives faster, or the parry-riposte is made faster (so slow, fast, slow, slow; slow slow, fast-fast).
Adding movement to this is another option. Traditionally this is how fencing lessons often go—it’s how I learned and it’s what masters are still teaching instructors. Have the students start out standing in close measure; each will go through the exercise 5-10 times. Next, have them move one step out and advance/step in to target. Then, have them take a little more distance so that they’re in critical distance or about tip to tip/top third of the blades; from here have them perform the drill with a lunge.[3] Lastly, have them advance in and lunge. With the advance lunge it’s possible to play with tempo via the feet too.
If in doubt or if you want more perspective, reach out to other fencers working in the same tradition. If you don’t know them well, then it pays to start your message or email politely. That should be obvious. You may find not only help, but new ideas to share with your students or group. There is no reason to go it alone, not when there are people who have been working on the same material for a long time.[4]
NOTES:
[1] If one only looks at the image and description of the grip where the the thumb is placed on the backstrap, etc., then it is easy to miss that in use the hand’s position changes fairly often. One thing the molinelli teach us well is how this works, and, how to make those minor adjustments with control.
[2] Barbasetti, The Art of the Sabre and Epee (1899/1936), 24:
20. Molinello to the Abdomen
This molinillo is composed of two movements:
1. Starting from the final position of the molinillo to the head (Fig. 10), describe backwards with the point half a circle, until your forearm is in a horizontal position (Fig. 13).
2. Continue this movement, hollowing the small of your back, raising the elbow as much as possible, in order to describe forward with your blade another half a circle and deliver a horizontal cut to the abdomen of your opponent (Figs. 8 and 14).
And for comparison, the 1899 text in German (46-47):
20. Schwingung auf den Bauch.
Sie wird auch in zwei Theilbewegungen zerlegt:
1. Man gehe von der Schlussstellung der Schwingung auf den Kopf aus (Fig. 10), führe die Klingenspitze mittelst eines lothrechten Halbkreises in der Richtung des Klingenrückens so nach rückwärts, dass der Vorderarm mit dem etwas erhobenen Ellbogen wagrecht liegt (Fig. 13).
2. Nun setze man die Bewegung durch Kreuz hohl unterstützt, halte den Ellbogen so hoch als möglich und führe die Spitze, einen Halbkreis beschreibend, direct nach vorne, so dass die Klinge den Bauch des Gegners durch einen nach links ansteigenden Querschnitt träfe (Fig. 14).
Of note, in step 2, there are some differences in language that are significant. The word Kreuz, for example, here means “small of the back,” not “cross,” the primary definition. As a native speaker of English (American), this definition works better for me than “hollow,” which is perfectly correct, but less specific. Conversely, Querschnitt, “cross-section,” doesn’t explain the action as well as “horizontal” does. However, ansteigenden, from ansteigen, “rise,” would be helpful in English. Classically, the rising cut from the right is less horizontal than it is diagonal, and it is, for me at least, the least easy to perform.
[3]Critical distance is where a fencer can lunge to target. This is relative given height, reach, etc., but a good place to start is where the blades would cross at the top third or tip. If too close or too far, one can adjust. I often refer to this concept merely as being “in distance.” Most of our attacks in sabre are delivered via lunge, so figuring this out is important not only in lessons, but in partner drills, and in a bout.
[4] In the “links” on this site, near the bottom, I’ve listed a few resources for those working in the late Italian tradition.
Anyone expecting a tale of disinterred bodies, zombies, or revenants a la the Acallam na Senórach is going to be disappointed by my use of “exhume.” Here I mean exhume as in attempting to resurrect an idea or practice. Instructors within my tradition face an interesting dilemma when it comes to looking at the past. The Italo-Hungarian school is a lineal descendant of the Radaellian school, so our emphasis in examining the earlier history of our tradition looks less to mining archives for lost sources and attempting, almost from scratch, to recreate them than it does stripping away a century of accretion from the modern sport. This is not to say, in any sense, that familiarity with classical or Olympic fencing fails us in looking at rapier, longsword, or anything else—not at all—but it is to say that where those looking at Thibault or Dobringer face extinct arts we face an altered one.
Students of mine can no doubt relate (perhaps with some impatience) at least one story of my tangential forays into sources and history during lessons. It’s not that I relish any comparison to Polonius, but that context is everything, and while not necessary to learn technique or tactics having some of that context helps. Knowing why we do something matters. In attempting to strip away modern cutting dynamics, for example, one needs to understand how the modern direct cut works and developed. If that is missing, then the chances of understanding how Radaellian molinelli work and why will be that much more difficult. This applies more to experienced fencers looking to study the earlier system than it does students completely new to sabre. Regardless, and to borrow a favorite analogy, like learning a new language sometimes we learn what we know better via something new. Even if one decides they favor the restricted molinello or direct cut, study of the larger, elbow-driven cuts will broaden their understanding.
Molinello, Molinello Ristretto, and Direct Cuts
What is a molinello? Etymologically, the term comes from Italian mulino (“mill”) as in mulino a vento (“windmill”). Like its cognate in French, moulinet, from moulin (“mill”), both look to Latin molinum. The diminutive endings suggest a “little” mill, in this case to rotating the sabre in circular fashion reminiscent of a windmill’s sails or watermill’s wheel. In a Radaellian context, molinelli refer to elbow-driven cuts. Some authors, such as Giordano Rossi (Manuale Teorico-Practico per la Scherma di Spada e Sciabola, 1885), also refer to a molinello ristretto or “restricted molinello,” a form that makes a smaller circular rotation. The elbow is still the fulcrum, but the shoulder and upper arm have less work to do.
Direct cuts, which are pushed at the opponent, are quick and performed correctly can arrive with more force than one might think possible. Much of this is achieved by the fingers which sort of snap the cut to as it arrives to target (cf. post 11-14-20 on Leszák’s Sabre Fencing). Direct cuts are impracticable for cavalry because they rely more on the extension of the arm and use of the fingers; from the saddle reaching to either side, to the front, or more especially down one must use more of the torso. A direct cut can be delivered with more of a lean, but they are not often taught that way. Many sabre systems employ the wrist to rotate cuts; this was true of many cavalry programs as well. Radaelli’s major “revolution” was to substitute the elbow for the wrist then in vogue–battlefield experience had shown that wrist molinelli were less telling.
Looking to sources, the first to share Radaelli’s ideas was Settimo Del Frate. In his Instruction for Fencing Sabre and Sword Fencing (1868/1876) Del Frate explains that the molinello is
the circular movement the sabre makes when striking a blow… The objective of the practice molinello is to acquire flexibility and agility in sabre-handling, to learn to move it firmly and well-balanced in the hand, and to direct the blows with proper edge-alignment, as well as with force and speed… The totality of practice of the molinelli enshrines the practical application of every blow and every parry. This is because in the execution of various molinelli the sabre passes exactly through all the movements and positions pertinent to the various blows and parries.
The elbow is the main fulcrum for the arm and sabre in every molinello. The body must always aid the movement of the weapon in order to achieve the necessary flexibility, to develop a long and accurate blow, as well as to be able to s top the sabre and recover in guard with the greatest balance and effortlessness.
Per molinello s’intende in generale il movimento di rotazione che fa la Sciabola vibrando un colpo… Scopo del molinello d’esercizio, si è quello di far acquistare scioltezza ed elasticità nel maneggio della Sciabola, di fare imparare a ruotarla ben ferma ed equilibrata nel pugno e dirigerne i colpi con esatta direzione del filo con forza e velocità… Nel complesso delle esercitazioni dei molinelli si trova la pratica applicazione d’ogni colpo e d’ogni parata, perchè la sciabola nell-esecuzione dei diversi molinelli passa appunto per tutti quei movimenti e per tutte quelle posizioni che sono proprie ai diversi colpi e parate di scherma.
L’articolazione del gomito deve essere il perno principale del movimento di rotazione del braccio e della Sciabola in ogni molinello. Il corpo deve sempre assecondare il movimento del ferro per acquistare la necessaria elasticità e per imparare ad allungare, dirigere, fermare il colpo, e ritirarsi in guardia con maggior equilibrio e facilità. [1]
The key term here, in terms of a major shift in cutting mechanics for many sabre fencers, is the use of the elbow (gomito). Those trained in the mid-century school, even those trained in modern Olympic sabre, attack in many of the same lines, require the same parries, and ultimately wish to achieve the same goal, at least in part, but how each executes this varies. [2] One way to illustrate the difference is by imaging the cone of defense as becoming ever narrower from Radaelli’s time to our own. As a system originally developed for cavalry, a fact we should never forget, the sphere of action is larger. In the saddle, one reaches to target, but must do so with security, and be able to recover quickly. On the modern piste, and especially with the role that speed has taken in competition, the sphere of action is very compact and linear. The modern sabre guard position has all but left defense aside in order to ready the fencer to pounce. The two images below, the first from Del Frate, the second from the 2012 Olympics, illustrates this:
Del Frate, 1876 Guard of 2nd ; cut scene from 2012 Olympic sabre final, Korea vs. Romania
Defense, the purpose of fencing, has given way to scoring points, and thus less attention is paid to one’s own safety in attacking. Where Del Frate’s example projects a sharp point, the modern fencer faces forward, back arm limp at their side, and is all but ready to use a starting block. Olympic rules of ROW (right of way) and HEMA’s various rulesets both suffer from people too ready to jump in and strike, not enough concern about not being hit at all. The weapons might be different, but the sense of invulnerability is the same.
Radaelli’s system was aggressive. Cavalry were put to best effect in quick attacks, in over-running positions, and though it undercuts the customary romance that attends the world of Radaelli and the Comte de Lasalle, at chasing and cutting up retreating infantrymen. This said, it is harder to defend oneself in the saddle, because one must also maneuver the mount. This is why the defense is elementary when mounted, and secondary to the effective use of mounted troops in offense. Supposedly Radaelli remarked that the parry does not exist—a well-planned and executed attack means one doesn’t need to parry.
On foot, however, one must adjust. While one can retain the lean often made with the molinelli in the saddle, measure and tempo work differently, as does how we move. The men who were taught as a platoon performed drills mounted and unmounted, but they did not always train one-on-one or have provisions for such exercise. Practice varied by nation, but for Italy, cavalry training focused more on maneuvers en masse and making the most of point and edge through drill. [3]
These “Molinelli” sound Cool—how do I do them?
Fencers who learned direct cuts within the late Italo-Hungarian tradition or within the modern game sometimes find the adjustment to the larger cuts unsettling. They seem so large, so prone to counters, and that is true. They are larger, and must be used in such a way that one is as safe as one can be when attacking. Any attack puts one at risk. However, were they as risky as these fencers think then they would not have been taught for sabre for foot as well. While some of Radaelli’s students, such as Ferdinando Masiello, continued to teach mounted combat, others like Luigi Barbasetti and Italo Santelli, taught this same cutting dynamic to men who never spent time (or very little of it) in the saddle. Of note, it was Radaelli’s students who, with colleagues in the Austro-Hungarian Empire, fused Italian and Hungarian principles to create the grandfather of the modern sabre game. Like it or not, chances are good if one has made any formal study of sabre that one has worked in a milieu influenced if not created by the Radaellian tradition.
Exploring an Example: Molinello to the Head from the Left
One of the least difficult molinelli for most people is the molinello to the head from the left as described by Settimo Del Frate.
Head cuts are easily the most common attack in sabre. Modern preference for the guard of third more easily facilitates a direct cut to the head—it’s more, well, direct, linear, and thus fast.
The Radaellian school and the generation which succeeded it preferred second as a guard position. There are solid reasons for this. First, second provides the fencer a greater degree of safety because the blade is extended closer to the opponent. It presents a clear threat; one is less likely to rush forward with a sharp blade pointed at them. Second, from the guard of second it’s short work to parry first, which covers the inside line, and fifth, which covers the head. Lastly, it provides a safer starting place to start larger cuts. Where third will expose the arm, and all with minimal protection as one does so, second keeps the opponent farther away and allows one to start the rotation (provided one does so at the right time and in the right situation) more safely. The opponent must move in to hit one as that arc begins—they must decide between a chancy arrest against the far more definite giant cut speeding their way. Take away the competitive mind-set and this choice becomes no choice.
Del Frate lays out this molinello in three movements:
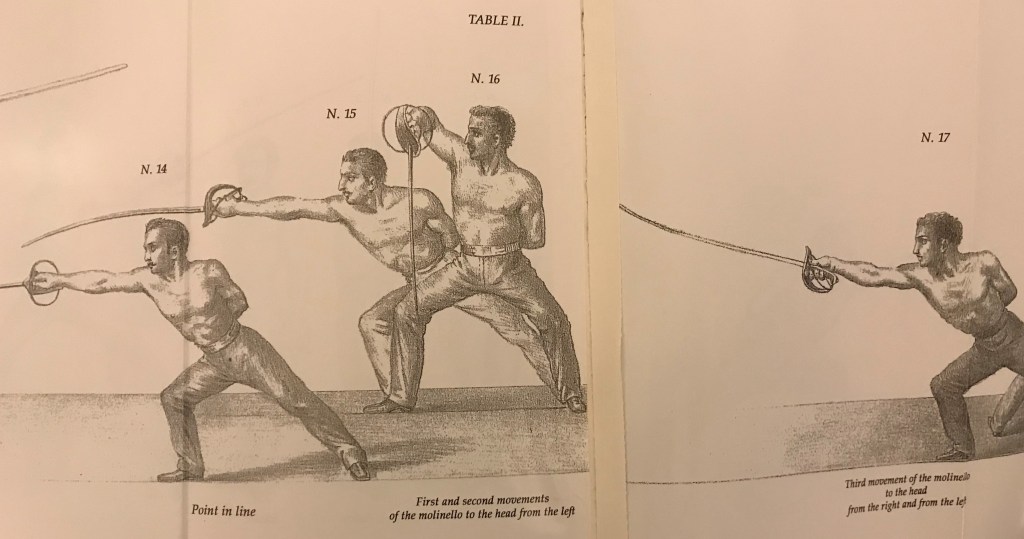
42. Molinello to the Head from the Left in Three Movements
Molinello to the head from the left, from point in line, one the commands:
One!—turn the fist from right to left by rotating the forearm, so that the edge of the sabre is turned up without raising the first (N. 15).
Two!—bend the arm, lowering the blade top toward the ground, and carry the sabre along the left flank with the edge turned to the left. The grip is to the left of and at head height approximately eight inches in front of the head; the body is balanced as in the guard position (N. 16).
Three!—with power from the arm and body movement, the sabre describes three-quarters of a circle from high to low, starting above and behind the head, bringing the sabre and the extended arm to a horizontal position in front of the body at head height with the edge turned toward the ground (N. 17).
42. Molinello di Testa da Sinistra in Tre Movimenti
Pel molinello di testa da sinistra dalla posizione di finta puntata al commando:
Uno—con un giro di pugno da sinistra a destra eseguito per rotazione d’avambraccio, si volge il filo della Sciabola in alto senza alzare il pugno (fig. 15).
Due—piegando il braccio si abbassa la lama colla punta verso terra, e si porta la Sciabola lungo il fianco sinistro, il filo rivolto a sinistra, l’impugnatura a sinistra ed all’altezza della testa e 20 centimentri circa più avanti; l’avambraccio all’altezza e in direzione della fronte; il corpo equilibrato come nella postura di guardia (fig. 16).
Tre—con slancio del braccio dall’avanti indietro, alzando il pugno e assecondando col corpo il movimento del ferro, si fa descrivere all Sciabola ¾ di circolo dall’indietro in avanti e dall’alto in basso, riportandola col braccio disteso in posizione orizzontale davanti al corpo ed all’altezza della testa col filo verso terra (fig. 17). [4]
The plates provide a stop-motion illustration of these three steps.
Figures 14-17, steps of the Molinello to the head from the Left
This descending molinello from the left is here described as both exercise and as offensive action, however it moves through the parry of first as well. The second step, as Del Frate points out in section 45, is the same as the parry of first. [5]. For the classical or modern sabreur most of this should be familiar—point in line, rotating the arm to move the blade to new lines, even the position taken in step two which recalls the parry of first.
What will seem new is the use of the elbow. Cutting to the head from first in contemporary sabre is tighter. From the parry, one starts the cut by rotating the wrist so that the blade begins its arc, then one drops the first to interpose some opposition as one pushes a cut to the head. [6] It’s a very linear vs. circular cut. The arm, as the cut finishes, returns to the plane of third and from there back to guard. So, for the fencer used to this dynamic, the first step is often just getting comfortable with the use of the elbow.
Getting Comfortable with Using the Elbow
Gross Motor Skills Drill
Drilling the gross motor actions of the molinelli will help. It can be easiest to start from first position (so, standing) and begin from a point in line. All one does is make rotations at the elbow, doing their best to keep the upper arm and shoulder relaxed and as motionless as possible. The goal is to isolate the elbow and forearm. Start in the air and when comfortable make the same strike against a mask or pell. It’s important to know how the cut lands, because the change in force, even before one adds the use of the body, will be different. Depending on the sabre one is using, one can still employ the fingers to finish the cut—one with a grip intended for a thumb along the back will do this easily; one requiring a racquet or hammer grip will not.
From Guard
Next, one can start the molinelli from guard. It’s easiest to start it from a point in line at first, but in truth the molinelli can be made from guard, on the march, as parries, or as part of a compound attack. [7] I normally have students use a point in line until they’re comfortable, then have them start from en garde and in second. This is an easy shift. As before, one executes the molinelli trying to isolate the elbow and forearm, only now one is shifting from a guard to do so rather than straight from a point in line.
With an Attack
One practical way to set this up as an attack is to take turns with a partner or instruct the student to begin with a feint thrust to the chest (inside line) from second. Made well, this feint should draw the opponent’s parry of fourth. [8] Rather than disengage with the point to the outside line and thrust, the attacker disengages under the guard only enough to then start the rotation along the left side of the body to complete the attack, the molinello from the left to the head.
Masiello, Sabre Fencing on Horseback, 1891, fig. III–this image depicts the scarto to the left, unmounted drill
When sufficiently comfortable, I then have them try the same attack, on its own or with a feint, using the body to assist the cut. This action employs the scarto, an evasive action where one draws the trunk back and chambers the sabre. Performed correctly the opponent’s attack falls short, and then using the potential energy gained in the scarto, one begins the return. The blade still moves first, the body still follows. In the example we’re examining, from second, the student shifts their weight and trunk backwards and as they do so they start the rotation along the left side of their body. At the furthest point back the blade is nearly perpendicular to the ground. The blade arcs overhead and the body follows—it can help to think of it as being pulled by the sabre forward. The trunk leans into the cut helping drive it to target. All of this can be done from guard, just shifting the trunk back and forth; it can be a very useful drill.
Adding the Lunge
Del Frate, 1868: while rendered rather extended, as the red lines I’ve drawn indicate the trunk should be no farther than the angle of the rear leg.
Next, I mix the lunge and scarto. There are several critical observations about the combination of lunge and lean to make. First, as always, the weapon leads the way, so one does not begin the lunge until the arm is all but extended. The lean follows the lunge. In terms of steps, it helps to break this down into two portions. First, from second, begin the rotation, extend, lunge, and finally lean into the cut, but no farther than the angle the of rear leg. Beyond that it is difficult to recover out of the lunge, forward or backward.
Next, practice this with the rest of the scarto. One way to do this is to have one fencer attack and force the other to parry first, and as they do so shift their torso toward the rear. Then execute the molinello as before.
Great, but when and how should I use these molinelli?
I’ve touched on several ways already. The molinelli constitute a drill on their own, but are also a good way to warm up—they incorporate more of the upper body than the woodchop drill does, for instance. They’re an ideal daily exercise.
One can use them to attack. This is most often, and certainly most safely done, after a preparatory action that clears the line. The example above employed a feint, but one can use beats and other actions on the blade to set them up too.
Defensively, each of the molinelli move through the principal parries, so they are an option for the riposte. [9] Moreover, with practice, one can use molinelli more defensively as a sort of active-parry, that is, performing them against the incoming attack. This is, more or less, the Italian version of “cross-cutting;” it’s a way of intercepting versus blocking an attack that uses the force of that blow to drive the return.
Molinelli or Direct Cuts?
This question, for me anyway, is in the same category that seeks to compare every sword against the Japanese katana: pointless. Context, damn it, context. Is a hammer better than a screwdriver? It is for pounding nails, less so for turning screws. In short, there are times where one might use molinelli and times when either molinelli ristretti or direct cuts are a wiser choice. [10] We limit ourselves if the only thing in our toolbox is a wrench, so why restrict ourselves to one style of cut?
It makes more sense to learn as many effective methods as possible if for no other reason than to know how to counter whatever one might face. Sun Tzu remarked that “Water shapes its course according to the nature of the ground over which it flows; the soldier works out his victory in relation to the foe whom he is facing.” [11] The analogy of water is old, more recently made famous by Bruce Lee, and it’s an apt one–where water must shift around or over rocks, logs, and navigate ever-shifting banks, so we fencers must cultivate a similar flexibility. In addition to honing our own technique, we must understand more than its sum; we must be ready to deal with the unexpected, the unforeseen, and that is far more easily done if we have some idea of what all we might face. This doesn’t mean we can’t have favorites—I’ve come to prefer the molinelli to direct cuts—only that learning all three versions has its merits.
So, molinelli or direct cuts? In answer the word that first come to me are the words of two other sages, Tulio and Miguel, who together said “Both? Both? Both. Both. Both is good.” [12]
“Road to El Dorado,” Dreamworks, 2000
NOTES:
[1] The English translation here is from Chris Holzman’s The Art of the Dueling Sabre: A Translation and Explanation of Cav. Settimo Del Frate’s Award-Winning Textbook on Giuseppe Radaelli’s Sabre Method for the Fencing Masters School of Milano, Staten Island, NY: SKA Swordplay Books, 2011, 10-11.
The Italian is from the Google Books pdf of Del Frate’s 1876 edition—the one Chris translated—Istruzione per la scherma di Sciabola e di spada del professore Giuseppe Radaelli Scritta d’ordine del ministero della Guerra, Milano, IT: Litografia Gaetano Baroffio, 1876, 16-17.
[2] The goal of making the touch is the same, but understanding, appreciation, and attention to execution in making that touch without being hit differs. Right of way (ROW) is meant to capture the spirit of hit and don’t be hit, but functionally is scored and taught as hitting legitimately with priority.
[3] See for example Ministry of War, Regulations of Exercises and Evolutions for the Cavalry, Book I, translated by Christopher A. Holzman, (Rome: Carlo Voghera, Printer Publisher of the Military Journal, 1873; Wichita, KS: Lulu Press, 2018).
[4] Holzman, The Art of the Dueling Sabre, 31-32; Del Frate, Istruzione per la scherma, 40.
[5] Holzman, The Art of the Dueling Sabre, 33; Del Frate, Istruzione per la scherma, 42.
[6] Fascination with coverage can get silly. I’ve seen some interpretations have fencers gyrate in crazy directions all to cover their ripostes. In this instance to drop the wrist and push forward would stop the arc mid-way and rob of it power.
[7] Cf. Holzman, The Art of the Dueling Sabre, 101.
[8] When the defender parries in first it changes things. Disengaging under is less sure as one is likely to run into the opposing steel, so making a disengage over, or cut-over, makes more sense, but this will mean making a molinelli to a different line. One option is to make the same feint, but when the defender parries first cut-over, and moving through sixth parry make a molinello to the outside cheek.
[9] Main molinelli vs. more advanced. Some of the molinelli are difficult. Barbasetti, for example, does a wonderful job describing the ascending cut from the right, but even his explanation makes it clear that how one contracts the back to make this cut is a lot harder than the example above.
[10] It may make my stricter Radaellian colleagues uncomfortable, but I think direct cuts have their place. In certain contexts they are appropriate. They’re just not Radaellian. For a long time I was more on the fence about this, but cutting practice using both styles of cutting has demonstrated for me that both can be pretty nasty. There is no question that elbow-driven cuts are more powerful. Using a 20mm blade I have no trouble sinking the blade a quarter to half-way through a pumpkin with a direct cut; a full molinello, however, easily severed the gourd and unless I was careful sunk into the wood beneath as well. This is to say that a direct cut, while it arrives with less force, would not be something someone would wish to receive in a duel.
[11] Sun Tzu, The Art of War, translated by Lionel Giles (London: Luzac & C0.,1910); The Internet Classics Archive, http://classics.mit.edu/Tzu/artwar.html , VI. 31.
[12] “The Road to El Dorado,” Dreamworks Animation, 2000. What? Sometimes “both” is a solid answer 😉
Unable to train with others during quarantine we make do. Solo drill is one avenue, but so too are discussions that allow us to dive deep into the Art. I had the pleasure this morning to chat a few moments with my friend Patrick Bratton, instructor at Sala della Spada in Carlisle, Pennsylvania, USA, [1] about a crucial fact we forget to our peril in studying Italian sabre: our tradition was born in the saddle. Radaelli and many of his students were cavalrymen, and if we forget this, then there are aspects of our practice that may have us scratching our heads.
This is a well-established and well-known fact, and one we pay lip-service to frequently, much as one mentions smallsword in the context of foil or that ROW (right-of-way) is meant to mimic the conditions of a duel, but the fact that we began as a cavalry method is something we need to dwell on from time to time. Why? In brief, ruminating on the cavalry elements within our technique and tactics not only informs our understanding of the history and development of Italian sabre, but also helps explain how the shift from saddle to foot occurred, and, what differentiates each method. Moreover, awareness of the differences can aid us in making the best use of both mounted and unmounted aspects of the weapon.
For example, the molinelli as presented in Del Frate and other key Radaellian texts are meant to do two things. First, the molinelli are exercise meant to build the muscles and responses needed to use the weapon effectively. In addition to edge-alignment, we work power-generation, timing, measure, and hand-eye coordination. Second, the molinelli teach us about parries. We talk about them as powerful cuts, and they are, but as Patrick mentioned today they are defensive in nature. Our mentor for all things Radaellian, Chris Holzman, sees it this way—here I quote Patrick from our earlier discussion: Ours is both a conditioning exercise and made to teach parry ripostes, the other systems are conditioning, but teach attacks not parry-ripostes. So as Chris stresses we don’t attack first intention with them, we use the point or an action on the blade. Naturally there are offensive applications for the molinelli too—our texts make this clear from Del Frate to Barbasetti—but if we ignore the fact that these fundamental exercises were meant for defense too, then we miss something important.
[addendum: counter-offensively, the molinelli can be used much like the cavazioni, that is to change lines; using them this way is a species of action on the blade. For example, from second one might make a molinello moving through prima as the opponent’s blade thrusts to the inside line, and cut a fendente/descending cut to the head. Thank you Chris =) ]
There are two points I’d like to follow up with in Chris’ summation. The first, is the defensive aspect, the second the importance of preparatory actions. In the saddle a fencer’s range of motion is different; timing is different too since the speed and size of the mount affect movement. The molinelli, because they sweep through each parry, also assume that parry in their arc; this means that they can be used as “active parries,” something valuable when range of motion and even sight are limited. They can be used this way on foot as well.
The second point, the importance of preparatory actions, is critical for anyone using these chambered cuts. They are larger cuts, so potentially open to counters, especially as those made from certain guards, such as third, mean a momentary exposure of the wrist. As such, we don’t normally use molinelli in direct attacks; instead, we set them up using a feint with the point, a beat, or some similar action to increase our safety. The goal here is to get the opponent to move (by feinting) or to move their steel for them (actions on the blade), both of which then clear the way for the chambered cut. [2]
For those of us who came up through a much later iteration of the tradition, like I did, this subtle difference can hit like a shock when it finally does.[3] However, it’s liberating too. One of the best questions I’ve had from students is how to make molinelli “work,” that is, how can we use these effectively and without opening ourselves up. This question has been at the heart of my own journey with earlier Italian sabre, and it’s revealing to me just how much my own understanding has changed, and, how that has informed my approach in class.
Early on, I used the molinelli primary as warm up, partly because they’re great for that, and partly because I didn’t feel completely comfortable incorporating them yet save as ripostes from certain parries (e.g. from prima or fifth). These days I will have students work the molinelli to warm-up, but we cover them tactically too. We’ll even cover them as direct attacks, but this latter exercise is more technical than tactical. It’s sort of a baby-steps approach toward making them a normal part of their game. Accustoming oneself to using the elbow as the axis of rotation takes time and practice; there is technique involved, from the way our fingers shift on the grip to the way we lean in and out slightly when cutting and defending. Likewise, I will have them play with measure to see from what distance they can safely chamber and still make the touch. It’s not easy. It’s also not immediately obvious to all what the value of this is.
Because these drills are not always obvious to students, I do my best to explain why we are drilling say a chambered cut from 3rd when we don’t normally attack with it. Normally I use a progressive approach, explaining at each step how it will lead into the next, e.g.
from in guardia, chamber and cut from 3rd to head or chamber from 2nd and cut right cheek
same drill, only with a lunge against a partner, working on what each person’s safe distance is to make this attack (NB switching partners is vital here as that measure changes)
finally, we add a preparatory action and mix the molinello into it, e.g. feint with thrust from 2nd to draw their fourth, then cut over with a molinello to the head
Before quarantine, I was including more and more work with molinelli both in class and in individual lessons. They’re an important part of our heritage as fencers of Italian sabre, but more than that they allow for a more powerful cut, something ostensibly important in historical sabre where our focus is nuanced–after all, presumably we’re not after points alone, but may be cutting bamboo or, more typically, explaining to new students why we see these larger cuts in the texts. For students from other traditions, and especially from the Olympic world, the shift from direct to chambered cuts can be off-putting. Direct cuts are faster, travel more efficiently, and made well tend to close off the line (the fist/guard often remains in the plane of third when cutting to any line, at least for many cuts, and can effectively block or set one up well to parry).
The molinelli, however, were a fundamental part of Italian sabre on foot after Radaelli’s reforms, and it is telling that his students retained them for so long, and more than that, that other nations saw the merit in this approach, most famously England (the 1895 Infantry Sword Exercise is largely based on Masiello’s work, though there are some errors of transmission that confuse a few things, the molinelli in particular). These cuts were more effective, because they’re more powerful and–importantly–made in a way to maximize defense so long as one has decent footwork and timing (thus the importance of drill). This does not mean hitting hard or with maximum force, but developing a controlled, powerful blow for when it is important to use one.
Herein is a major quandary for many within historical fencing. There is a cult around the word “martial” that seems to hold that only a hard, game-ending blow is legitimate. Hard-hitting was and remains a sign of poor training and/or attitude. Anyone can hit hard if they want, but hitting effectively with the force actually required in that instance, having that demonstrable control is the hallmark of a skilled fighter. The fact is that these more powerful cuts can be made safely—it just takes training and practice. Each drill, solo or paired, that we do with molinelli is ostensibly building this skill.
One of the exercises Patrick takes students through is the unmounted drill from works such as Masiello’s Sabre Fencing on Horseback and the 1873 Cavalry Regulations. This is such a fantastic idea, and one I am working on implementing on occasion myself. On the one hand students see, as they’re doing the very drill, how this might work in the saddle, but on the other they are afforded an opportunity to ponder how they might make use of this drill for fighting on foot. Thinking about and trying to make all this work in real time helps us develop skill, and with it, control. For fencers like me, who learned some molinelli, but spent more time on direct cuts initially, this sort of training makes all the difference. The ability to make both cuts is, I firmly believe, important, for even if one chooses one style over the other one must be able to counter whatever is thrown at them.
For me, this is in keeping with the spirit if not letter of the law. After all, many of these works were intended to assist a soldier not only in the field or saddle, but to prepare officers unfortunate enough to find themselves facing a duel. In this way, many of these works were not just cavalry drill, but sword drill meant to cover all the bases. It is, arguably, one of the facts that make Italian sabre so dynamic and flexible, and why it came to define sabre at its apogee as military practice was transformed into sport.
[1] For a little more about Patrick and Sala della Spada, see https://www.saladellaspada.com/. He also maintains a facebook page.
[2] One can use molinelli as direct attacks, but it’s more difficult and dangerous. One way is to cut in such a way as to close the line. For example, from the guard in 2nd, one can chamber a cut in third, then cut to the chest, but more across the chest closing the line. Rather than cutting through and rolling back to guard in the same plane, one would cut in such a way that one ends up more or less in fourth.
[3] Understanding something doesn’t equal confidence in it. Having learned a few molinelli from Al Couturier and his assistant coaches, and having used them for a long time, made it easier to pick up the others, but using them as Del Frate and others recommend took me longer to feel confident about. In some ways, my experience with historical sabre has been a long, slow process of stripping away layer upon layer of habit and outlook acquired from decades in mid-century sabre. Tactical reasoning in particular is so tied to ROW that it can be difficult to get around the short-comings in it, and for a while I was trying to use Radaellian maneuvers as substitutes for the mid-century ones I originally learned, but that is not always a one-to-one correspondence. More of it is than not, but even so, some actions, like the sforzi di cambiamenti went out of favor after Rossi (1885), and so these were not actions we drilled. To me, to be a teacher means one is always a student, and happily research into Radaelli’s system means I have a lot to look forward to, a lot yet to learn.
IMAGES: these images are from Cav. Ferdinando Masiello, Sabre Fencing on Horseback, trans. Christopher A. Holzman, Wichita, KS: Lulu Press, 2015 (orig. published 1891).